


There’s something undeniably comforting about the aroma of freshly baked bread weaving through your kitchen-but not everyone has hours to dedicate to dough rising and kneading. Enter quick breadsticks: the perfect blend of ease, speed, and savory satisfaction.These golden, crispy snacks come together in a flash, requiring minimal ingredients and no yeast, yet delivering maximum flavor and crunch. Whether you’re seeking a last-minute appetizer, a cozy accompaniment to your favorite soup, or simply a delightful treat to curb hunger, quick breadsticks offer a homemade solution that’s as delicious as it is indeed accessible. Let’s dive into the world of these speedy snacks and discover how simple it can be to bring warm, irresistible breadsticks straight from your oven to your table.
quick breadsticks are the perfect canvas for both soft, chewy bites and crisp, golden edges-a delightful snack that feels both indulgent and easy to make. Whether you’re craving a last-minute appetizer or a cozy companion for soup or salad, mastering the dough and baking process unlocks endless possibilities. These breadsticks breathe warmth and rustic charm, inviting your kitchen to fill with the aroma of freshly baked goodness.
Prep and Cook Time
- Prep time: 15 minutes
- Rise Time: 30 minutes
- Cook Time: 12-15 minutes
- total Time: 57-60 minutes
Yield
Makes approximately 12 medium-sized breadsticks
Difficulty Level
Easy – perfect for first-time bakers and busy cooks alike
Ingredients
- 2 ¼ tsp (1 packet) active dry yeast
- 1 cup warm water (about 110°F / 43°C)
- 2 ½ cups all-purpose flour, sifted
- 1 tbsp granulated sugar
- 1 tsp fine sea salt
- 2 tbsp olive oil, plus extra for brushing
- 1 tsp garlic powder (optional, for flavor boost)
- 1 tbsp fresh rosemary, finely chopped (optional)
- Coarse sea salt or flaky salt for sprinkling on top
Instructions
- Activate the yeast: In a small bowl, stir the active dry yeast and sugar into the warm water. Let it sit for 5-7 minutes or until frothy and bubbly, signaling that the yeast is alive and ready.
- Mix the dough: In a large mixing bowl, combine the sifted flour, fine sea salt, and optional garlic powder.Make a well in the center and pour in the frothy yeast mixture and 2 tablespoons of olive oil.Stir gently with a wooden spoon until the dough begins to come together.
- Knead to perfection: Transfer dough to a lightly floured surface and knead for 7-8 minutes until smooth and elastic. The dough should be soft but not sticky.Add just a teaspoon more flour if too wet.
- Let the dough rise: lightly oil a large bowl and place the dough inside, turning once to coat. Cover with a clean kitchen towel or plastic wrap and set it in a warm, draft-free spot to rise for about 30 minutes, or until doubled in size.
- Shape your breadsticks: Once risen, punch down the dough gently to release air. Divide into 12 equal portions. Roll each portion into a 6-inch long, slender stick. For a rustic look, gently twist each breadstick if you like.
- Prepare for baking: Line a baking sheet with parchment paper. Arrange breadsticks with a little space in between. Brush lightly with olive oil and sprinkle with coarse sea salt and chopped rosemary if using.
- Bake until golden: Preheat your oven to 425°F (220°C). Bake the breadsticks for 12-15 minutes or until golden brown and crisp on the edges. Rotate the pan halfway through to ensure even colour.
- Finish and serve: Remove from the oven and brush again with a light coat of olive oil for a glossy finish. Let cool slightly on a wire rack before serving warm.
Tips for Success
- Soft vs. crispy: For softer breadsticks, bake on a lightly greased baking sheet and tent loosely with foil for the first 8 minutes. For crispier results, use parchment paper and increase baking time by 2 minutes.
- Flavor boosters: Don’t shy away from coating the dough with flavored olive oil-think garlic-infused or chili-infused oils-to add layers of aroma.
- Make ahead: Prepare the dough the night before and refrigerate covered overnight. Bring dough to room temperature and rest before shaping and baking.
- Substitutions: Whole wheat flour can replace half the all-purpose flour for a nuttier taste and denser texture.
- Troubleshooting: If your breadsticks feel dense, check your yeast expiration date or water temperature; both can impact rise and texture.
Serving Suggestions
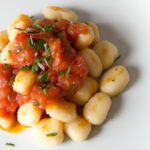
Serve these quick breadsticks alongside a robust tomato sauce or a bowl of creamy hummus for dipping. Garnish with freshly chopped parsley or grated Parmesan cheese for added flair. They also pair beautifully with fresh salads or your favorite soup-imagine dipping these warm, herb-sprinkled breadsticks into a bowl of tangy marinara or roasted garlic soup for an irresistible combination.
For an eye-catching presentation, arrange breadsticks in a rustic basket lined with a linen napkin or stack in a tall glass jar tied with twine. Add a small ramekin of flavored olive oil or balsamic glaze for dipping to complete the spread.
Nutritional Facts
| Nutrient | Per Breadstick (approx.) |
|---|---|
| Calories | 110 kcal |
| Protein | 3 g |
| Carbohydrates | 18 g |
| Fat | 3.5 g |

Explore our easy homemade pizza dough recipe to pair perfectly with your fresh breadsticks or read more about the science behind yeast on King Arthur Baking’s yeast guide.
Q&A
Quick Breadsticks: Easy, Fast, and Delicious Homemade Snack – Q&A
Q1: What makes quick breadsticks different from conventional breadsticks?
A1: Quick breadsticks skip the long rise and fermentation times that traditional yeast-based breadsticks require. Instead, they rely on baking powder or baking soda as leavening agents, making them ready in a fraction of the time without sacrificing flavor or texture. This means you can enjoy fresh, golden, crispy breadsticks in under 30 minutes!
Q2: What basic ingredients do I need to make quick breadsticks at home?
A2: The beauty of quick breadsticks lies in thier simplicity! You’ll typically need all-purpose flour, baking powder (or baking soda combined with an acid like buttermilk), salt, olive oil for richness, and liquid such as water or milk to bring the dough together.Optional extras include herbs, garlic powder, or cheese for extra zing.
Q3: Can quick breadsticks be customized for different flavors?
A3: Absolutely! Quick breadsticks are a blank canvas. Mix in dried herbs like rosemary, oregano, or basil for an aromatic twist, or sprinkle grated Parmesan or nutritional yeast on top before baking. You can even brush them with garlic-infused olive oil post-baking for that irresistible fragrance.
Q4: What’s the best way to ensure my breadsticks come out crispy?
A4: For that perfect crispy exterior, make sure you roll your dough to an even thickness-too thick and they stay soft inside, too thin and they can burn. A hot oven (around 400°F/200°C) helps create a golden crust quickly. Lastly, don’t skip brushing with olive oil or melted butter before baking; it enhances browning and crunch.
Q5: are quick breadsticks suitable for gluten-free diets?
A5: quick breadsticks can definitely be made gluten-free! use a gluten-free all-purpose flour blend designed for baking, and ensure your baking powder is gluten-free as well. keep in mind the texture might be a bit different-tender rather than chewy-but still delicious.
Q6: How can quick breadsticks be served or enjoyed?
A6: These versatile bites are perfect as a snack right out of the oven, paired with dips like hummus, marinara sauce, or creamy spinach dip. They also shine as an accompaniment to soups, salads, or cheese boards. You can even use them as a fun vehicle for sandwich toppings, breaking up the usual bread routine.
Q7: Can I prepare quick breadsticks ahead of time?
A7: You sure can! Prepare the dough in advance and refrigerate it wrapped tightly for up to 24 hours. When ready, just roll, slice, and bake. Alternatively,bake a batch and store them in an airtight container; gently reheat them in the oven to refresh the crispiness.
Q8: What kitchen tools do I need to make quick breadsticks?
A8: Minimal equipment is needed. A mixing bowl, rolling pin, baking sheet, and a sharp knife or pizza cutter for shaping the breadsticks will do the trick. Optional tools like a pastry brush help with applying olive oil or butter, but are not essential.Q9: Are there any tips for making quick breadsticks kid-friendly?
A9: Kids love fun shapes, so consider cutting the dough into twists, knots, or even letters! Add mild cheeses or a sprinkle of cinnamon sugar for a touch of sweetness. Quick breadsticks are a fantastic way to sneak in some whole-wheat flour or finely chopped veggies for a gentle nutrition boost.
Q10: Can quick breadsticks be vegan?
A10: Definitely! By simply swapping out dairy milk for plant-based alternatives, and using olive oil rather of butter, you can create delicious vegan breadsticks with all the same crispy, savory goodness.
Enjoy the art of quick breadsticks-your new go-to snack that’s as easy as it is delightful!
In Retrospect
Whether you’re whipping up a last-minute snack for guests or simply craving something warm and comforting,these quick breadsticks deliver on all fronts-easy to make,fast to bake,and utterly delicious. With just a handful of ingredients and minimal effort,you can bring the irresistible aroma of fresh-baked breadsticks into your home anytime.So next time hunger strikes, skip the drive-thru and savor the satisfying simplicity of homemade breadsticks that are sure to become your go-to snack.Happy baking and even happier snacking!